5 Machines We Rely On For Shoemaking And Our Philosophy On Expensive Equipment/Machinery
When folks visit our showroom in Vancouver, we will often give them a tour of our workshop. We thought it might be nice to share a similar experience on this platform for those who can’t visit us in-person. Although we rely on handheld tools for a significant part of the process, we also use machines to aid in manufacturing our boots. There is a balance to using machines and using hand held tools - the machines allow for faster production which require an experienced person to operate. There are some things machines cannot do as well, like crimping.
Here is an overview of 5 machines we use regularly (We do use some others):
- Clicker
- Skiver
- Post Machine
- Oustole Stitcher
- Sander
1. The Clicker/Clicking Machine:
 Clicking machine (metal dies hanging on the right)
This heavy duty machine is used to cut out various shapes which we have metal dies for - these dies are pre-formed (like a cookie cutter, but shaped like a shoe). We use the dies and the clicker to cut out our insoles and some patterns for leather uppers, you may see wallet makers have dedicated shapes for their wallets too.
Having dies on hand saves a lot of time, every piece you cut out is consistent and it decreases chances for errors over cutting by hand with a knife. The disadvantages of using dies is they take up a lot of space, it is not economical or useful to source dies for every single shape you need - they’re expensive to make!
At HD Russell, we often use our hands and a knife to cut leather - especially when we are making custom patterns for bespoke shoes or boots. In a perfect world, we would have metal dies for our Chelsea boots - which we still cut by hand. Being able to cut leather by hand is a very useful and valuable skill.
Fun Fact: You can tell the difference between an old clicker and a new clicker - a new clicker will have 2 buttons and require two hands to press where an older one will have only 1 button to press. The 2 button trigger is a safety feature so you don’t get your hands caught in the clicking process!
2. The Skiver/Skiving Machine
 Skiving Machine @ HD Russell
A skiving machine shaves leather down to a desired thickness. The main reason skiving is necessary is when two pieces of leather are sewn together, the two pieces will create a thick bump. Since we don’t want a bump where the 2 pieces of leather are sewn together, the edges of leather need to be shaved or skived down in order to maintain an even consistency where the pieces of leather are joined together.
We use the skiving machine regularly when making uppers and we change the blade in our skiving machine about once a year. The skiving machine is ideal for use on larger and stiffer leathers; for more intricate work, skiving by hand is ideal. We skive by hand when we need to thin out leather lining or our pull tabs which are made of nylon.
Our shoemaker has a dedicated knife for skiving by hand which is a little more flexible. We have had to resort to hand skiving when the skiving machine needed repair. Hand skiving is a very valuable skill in shoemaking and leatherwork in general.
3. Post Machine/Sewing Machine
 Durkop 888 Post Machine
This sewing machine is probably the most essential for us - we use this machine to sew leather uppers. We use a post machine instead of a walking foot because it allows for maneuvering and pivoting of the leather quickly and allows us to sew in difficult to reach areas.
We use an Dürkopp Adler 888 - it is a direct drive machine and operates without a belt and operates very quietly when being used. We recently had a complete halt in production because the bottom feeding wheel broke - this can be avoided by applying machine oil periodically. Over the past 5 years using this machine, we have learned consistent maintenance of this machine will avoid any big issues. It is a very reliable machine and one of our heavy workhorses.
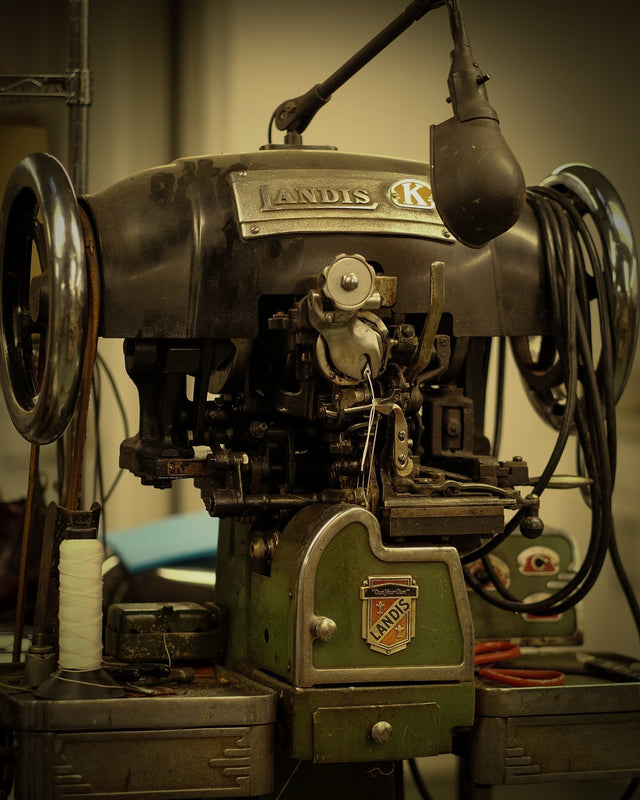
4. Outsole Stitcher
 The oldest in our lineup of machinery, Landis K Outsole Stitcher
The Landis K - this old beast of a machine is meant to be used in shoe repair and is used to stitch the rubber outsole to shoes and boots The outsole stitcher heats up wax that covers the thread as it stitches through the midsole and outsole; as the wax cools and dries at room temperature the wax sets the stitch and is then locked in place.
Although we would love to get our hands on a Rapid “E”, we do with what we have. We have had this machine for over 5 years and we’ve gotten to know it and its nuances.
We actually made a few alterations to our Landis K to get it to do what we need; we got a little help from a local genius who makes and fabricates metal parts to make a part for it and our Landis works beautifully now. The Landis K was founded in the late 1800’s, we’re not sure how old ours is, but we figure it’s likely the oldest of all the machines we use.
5. Sanding Machine - Industrial Shoe Finisher
 Sutton Industrial Sander (Finisher not pictured)
This allows us to shape and sand the edges of our leather boots and shoes quickly and with precision. This machine is far superior to sanding and finishing by hand. We picked up our sander and our finisher (not pictured) used from an old shoe repair store.
We’ve seen videos on YouTube where the shoemaker will sand by hand or use a piece of glass to finish a pair of shoes - it’s not a better or a worse way of making footwear - but it is a lot slower.
We maintain this machine by emptying the fine leather dust that accumulates - we have actually witnessed a fire when the bag wasn’t emptied, the machine was running and heated up the leather dust. (We have multiple fire extinguishers if it ever happens to us!)
Ps. Be careful with the sander - sanding your own skin is painful but maybe a rite of passage as a shoemaker.
What To Look For In A Machine?
Find a good operator!
Seriously, if you are looking at buying a used machine - make sure you test it so you know that it is functional. When it comes to the machinery and tools, we don’t buy the most expensive out there - we are too pragmatic for all the bells and whistles. If basic machines and tools will get the job done then that device is perfectly fine - don’t be tricked into believing a more expensive machine or tool will result in a better product, similar to buying expensive golf clubs doesn't make you a better golfer).
One advice we have is “get to know your machine”. All machines have moving parts that will break or stop working at some point. Every machine you use will need a new blade, a new belt; a needle will break, a part will snap in half. It is super important to know how to maintain your machines and to know how to fix them or you may lose a lot of time and spend a lot of money trying to find someone to fix your machines for you.
We learned this one summer when the needle in our Durkopp wouldn’t catch the stitch - we lost a couple days while we waited for someone to come by the workshop to look at the machine. They only looked at the machine… they didn’t even fix it AND we had to pay them for their time. We learned an expensive lesson - look through the manual before calling for help!
Our Dream Machine?
If there was one machine we would get if cost wasn’t an issue, it would be a laser cutter. It can be programmed to cut out any shape of leather without those clunky heavy metal dies - from bags and wallets to boots and shoes and boots of course. But… we’re pretty sure we’d still need the clicker to cut through the thick pieces of leather that we use for insoles and heel stacks.
1 Comment
I just visited the the Clarke’s Shoemakers Museum at Street near Glastonbury. Some amazing looking complicated machines there, its hard to imagine the amount of incredibly skilled engineering work that must have gone into designing & making them, from prototype to fully functional machine! One of the brilliant inventors came from a family of slaves in Surinam, quite a life journey.